


If you open a record for viewing or editing, you will see a multi-tabbed screen with a familiar CMS-1500 form in front of you. This is the record editor for CMS-1500 data files in SolAce.
Starting with the top bar you have three buttons.
| Audit Info | |
Click it to see who created the record and when it was created, along with who last modified it and when. |
| Save | |
The Save button will be enabled whenever SolAce detects that the record has changed. This could happen as a result of you changing a value, or because the edit checks have updated the warnings list and the file needs saved as a result. SolAce checks for record changes whenever you switch tabs across the top, whenever you switch records, and when you click the Accept or Verify buttons. The Save button will not light up while you are editing on a tab unless you do one of those actions. |
| Close | |
The Close button will close the record editor and return you to the record list. It will prompt you to save or discard your changes if there are any changes detected. |
Just below the top bar is the navigation area. This area displays the claim number that is being edited, as well as the total number of claims in the file (i.e. Record 1 of 16). The arrow buttons allow you to scroll to the first record, previous record, next record or last record.
![]()
The Status on the right side of the navigation area is the record's status. Click the button to the right of the Status field to change the record status, such as to status a Rejected claim to Resend. A claim can also be set to status "Sent (manual)" status to make SolAce think it has already been transmitted.
The middle portion of the screen between the navigation area and the Warnings area is the editing area. This area displays data for the record you are viewing, dependent on which tab you have selected. There are 9 tabs and we will thoroughly describe each one.
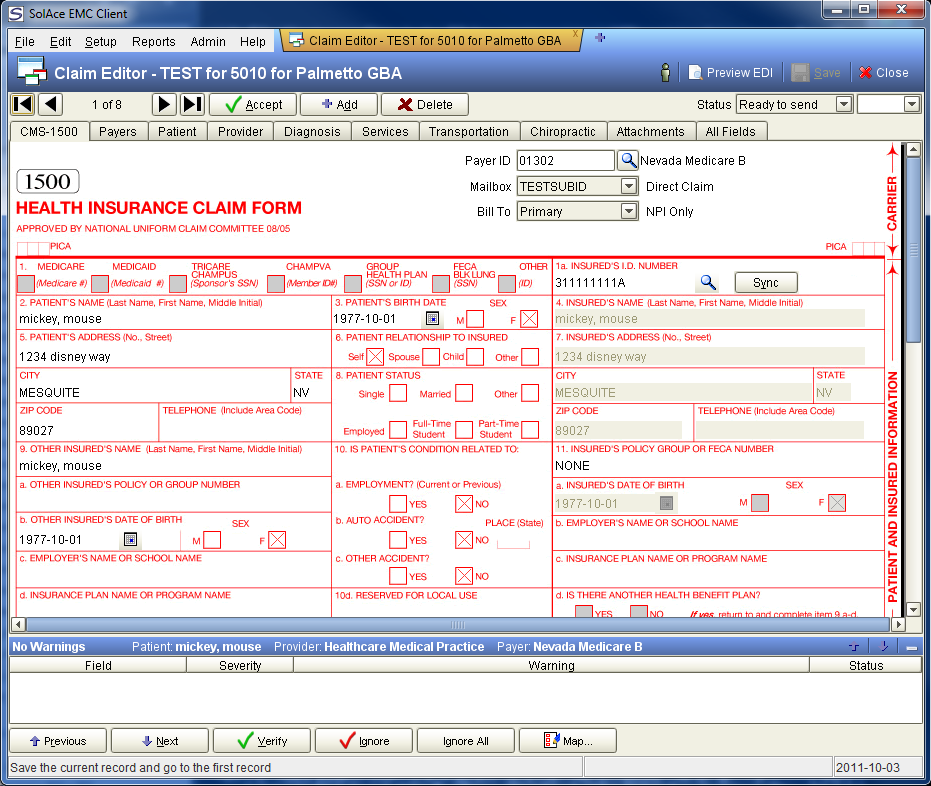
At the bottom of the screen is a list of warnings for the current record that need to be corrected before transmission. To locate the field with a warning, double click on the field name in the warnings list. Once you are placed in the field, you can begin to correct it. You will also notice that the field is highlighted with a yellow background to make it easier to find on the screen.
Remember that the data that appears in the fields is based on the map that was used to import the data, so adjusting the map and re-importing can be an option to get rid of warnings. For example, if the fields have not been mapped properly, the data will not appear in the fields correctly and will cause warnings to be generated. When this happens, you should review your map for adjustment needs, then delete the imported data file and import the data again.
SolAce automatically runs the edit checks that produce the warnings you see. It does this while you are editing whenever you move off the record to a new record, and it does this if you click either the Accept or Verify button. It also runs the edit checks for all records when you Save the file.
You can mark a warning to be ignored and it won't keep the file in the "Hold (warnings)" status. You can also click the Ignore All button if you want to ignore all warnings, although we don't recommend doing this on a regular basis.
Once you have a file that doesn't have any warnings, or the warnings are all marked to be ignored, the file will enter the "Ready to send" status.
| Previous | Positions you to the previous warning in the file. |
| Next | Positions you to the next warning in the file. |
| Verify (Alt+V) | Verifies the claim being edited by running edit checks. Same as Accept. |
| Ignore (Alt+I) | Mark the selected warning to be ignored. A warning with a Severity level of High cannot be ignored. To reset an ignored warning you can click Ignore on it a second time and it will revert to its original state. |
| Ignore All | Marks all warnings in the file to be ignored, after confirming that you meant to do this. |
| Map | Switch over to the map that was used to import this batch. |
To edit the claim's Payer data, click on the Payer tab to
locate the fields.
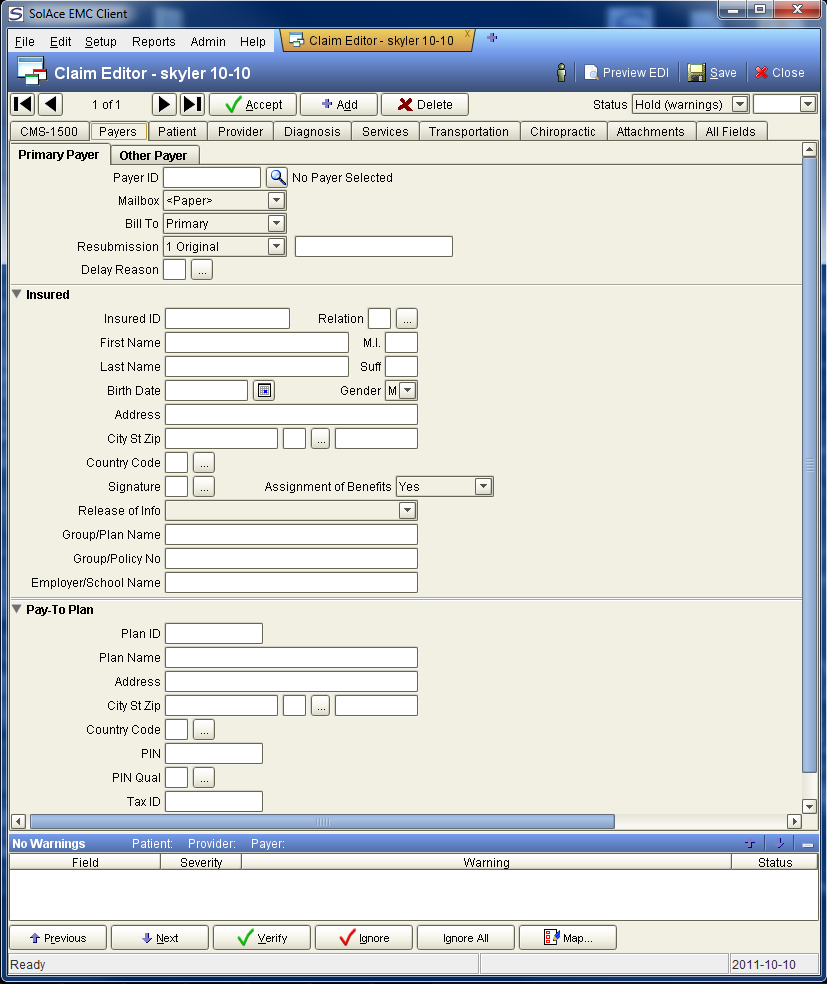
| Payer ID | The ID of the Payer this claim is being submitted to. This value will be resolved to an entry in the SolAce Payer List whenever possible. SolAce automatically searches on payer IDs, names, and aliases. Click the search button on the right side of this field to search and select a payer. Once you have selected a payer SolAce will ask if you want to alias the payer on future claims that have the same payer name that was printed on the current claim. |
| Mailbox | The mailbox that this claim is being routed to, based
on the Payer and Provider information on the claim and the Mailboxes
that you have defined in SolAce
Directly following the mailbox field you will see a description of how the claim will be routed. If the selected mailbox is a direct link to the payer, the description will read "Direct Claim". If a clearinghouse mailbox is present and the claim can be routed to the clearinghouse the description will be "Free CH Claim", "CH gov't claim", or "CH paper claim". This depends on the Payer Option you have selected for your clearinghouse mailbox. The estimated fee for "CH gov't claim" and "CH paper claim" will also be displayed, assuming you are allowing those types of claims to be sent to the clearinghouse. |
| Bill To | You can distinguish between a claim to the primary or secondary payer using this field. When the claim is selected as secondary additional fields will be displayed: Primary Paid, Primary Allowed, OTAF, MSP Ins Type. If this field is primary, and there is a Other Payer specified, than the Other Payer (located at the bottom) is the secondary. If this field is secondary, the the Other Payer is primary. |
| Resubmission | Select correct code for resubmitting claims. |
| Original Ref. No. | The original reference number when resubmitting a paid or denied claim. Required by some payers. |
| Delay Reason | Click on the box with the three dots and select the delay reason. |
Insured section (disabled when the payer is Medicare or Tricare)
| Insured ID | The identification number of the insured. The label of this field changes to "HIC #" when a Medicare payer is selected. The Insured fields are disabled for payers that do not use box 11 of the CMS1500 form, such as Medicare and Tricare. |
|
Relation |
Select relationship of insured to patient. |
|
First Name |
The first name of the insured. |
| M.I | The middle initial of the insured. |
| Last Name | The last name of the insured. |
|
Suff |
The credentials or suffix such as Junior or Senior of the insured. |
| Birth Date | The birth date of the insured. |
| Gender | The gender of the insured. |
| Address | The address of the insured. |
| City State Zip | The city, state, zip of the insured. |
|
Country Code |
The country of the insured. |
| Signature | A code box indicating how the insured's signature is on file. Check Assignment of Benefits if provider receives payment. |
|
Release of Info |
The status of ROI of the insured. |
| Group/Plan Name | The name of the primary insurance plan. Not used for Medicare or Tricare claims. |
| Policy/Group Number | The primary insurance policy and/or group number. Not used for Medicare or Tricare claims. (Medicare primary claims usually use the word NONE in this box) |
| Employer/School Name | The primary employer or school name. Not used for Medicare or Tricare claims. |
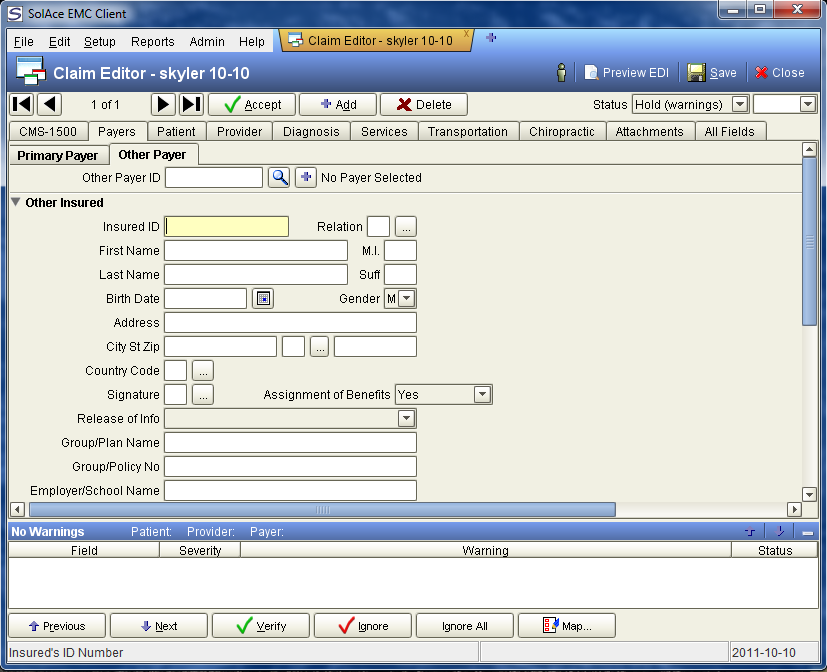
| Other Payer ID | The payer ID for the other payer. If a valid payer ID, name, or alias is found in the Plan Name field it will be transferred to this field automatically. If this field does not contain a valid Payer ID you will get a warning. It must either be correct or not be specified at all. |
| + button | The + button to the right of the Other Payer ID field can be used to auto-add payer names or IDs that were imported into this field. This causes the value in the field at the time you click the + button to be recorded in the SolAce Payer List. |
| Insured ID | The identification number of the insured. The label of this field changes to "HIC #" when a Medicare payer is selected. The Insured fields are disabled for payers that do not use box 11 of the CMS1500 form, such as Medicare and Tricare. |
|
Relation |
Select relationship of insured to patient. |
|
First Name |
The first name of the insured. |
| M.I | The middle initial of the insured. |
| Last Name | The last name of the insured. |
|
Suff |
The credentials or suffix such as Junior or Senior of the insured. |
| Birth Date | The birth date of the insured. |
| Gender | The gender of the insured. |
| Address | The address of the insured. |
| City State Zip | The city, state, zip of the insured. |
|
Country Code |
The country of the insured. |
| Signature | A code box indicating how the insured's signature is on file. Check Assignment of Benefits if provider receives payment. |
|
Release of Info |
The status of ROI of the insured. |
| Group/Plan Name |
The name of the other insurance plan. The default Medicare maps included with SolAce will bring the payer ID for Medigap codes (aka. INKEY or OCNA in some regions) into this field, from box 9D of your print file. If the ID is valid the Payer ID will be transferred to the Other Payer ID field and your crossover claims will work properly. If it is not valid no warning will be issued and SolAce will simply not submit other payer information because there is no valid Other Payer ID specified. If you want to be warned if your Medigap IDs are incorrect, change your map to pick up the OTHER-PAYER-ID field from box 9D, in addition to picking up the OTHER-INSURED-PLAN-NAME from that box. SolAce allows two fields to pick up data from the same place on the print form. If your system prints the name of the company in 9D, you can still utilize crossover claims by creating an ALIAS for that name. First, map OTHER-PAYER-ID as described above so you are alerted when an invalid entry is found. Then, when you see the warning that your name does not match to a payer, simply click the search button to the right of the Other Payer ID field and select the proper Medigap payer ID from the SolAce payer list. Answer Yes when asked if you want to alias it. |
| Policy/Group Number | The other insurance policy and/or group number. |
| Employer/School Name | The other employer or school name. |
To edit the Patient and Insured data, click on the Patient tab to locate the fields.
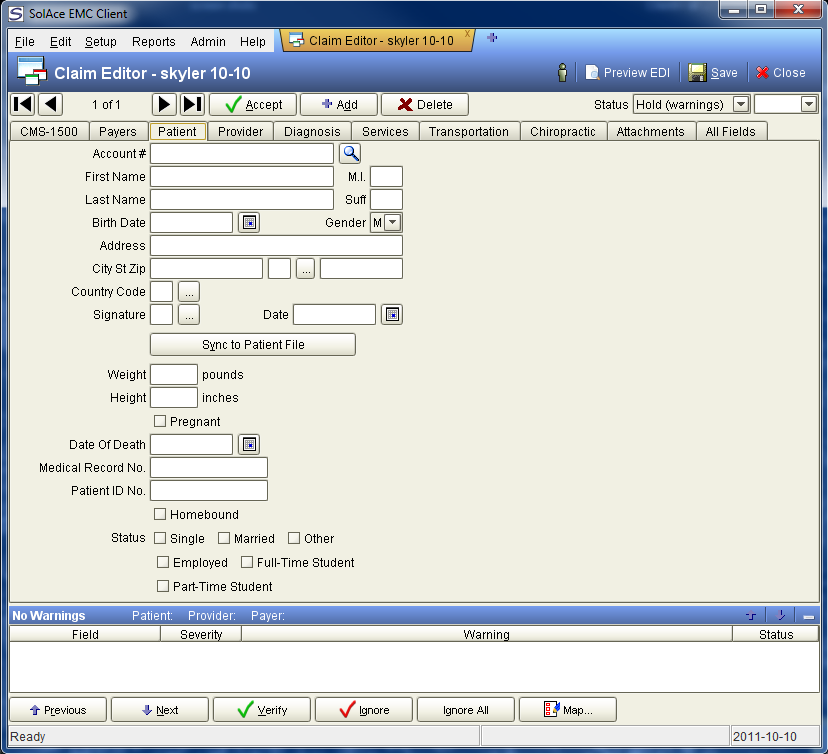
| Account # | The provider's patient account number. If using SolAce for direct entry click the search button to the right of this field to select a patient from the SolAce Patient list and optionally auto-fill this claim with their information. |
| First Name | The first name of the patient. |
| M.I. | The middle initial of the patient. |
| Last Name | The last name of the patient. |
| Birth Date | The date of birth for the patient. |
| Gender | The gender of the patient. |
| Address | The street address of the patient. |
| City State Zip | The city, state and zip code of the patient. |
|
Country Code |
The country of the insured. |
| Signature | A code box indicating how the patient's signature is on file. |
| Signature Date | The date the patient's signature was filed. |
| Sync to Patient File button | This button will update the SolAce Patient file with the information from the claim you are looking at. If the patient does not exist in the SolAce Patient file a new record will be created for them. If the patient already exists then the information will be overwritten with information from the claim. This is for direct entry users. |
| Weight | Weight of patient. |
| Height | Height of patient. |
| Date of Death | Date of death of patient if applicable. |
| Medical Record No | Patient's chart number. |
| Status | Marital and Employment status indicators. |
To edit the Billing Provider, Pay-To Provider, Referring/Supervising Physician, Ordering Provider, Purchased Service Provider and Service Facility Location, click on the Provider tab to locate the fields. To view or edit all the fields you may need to use the scroll bar on the right side of the screen.
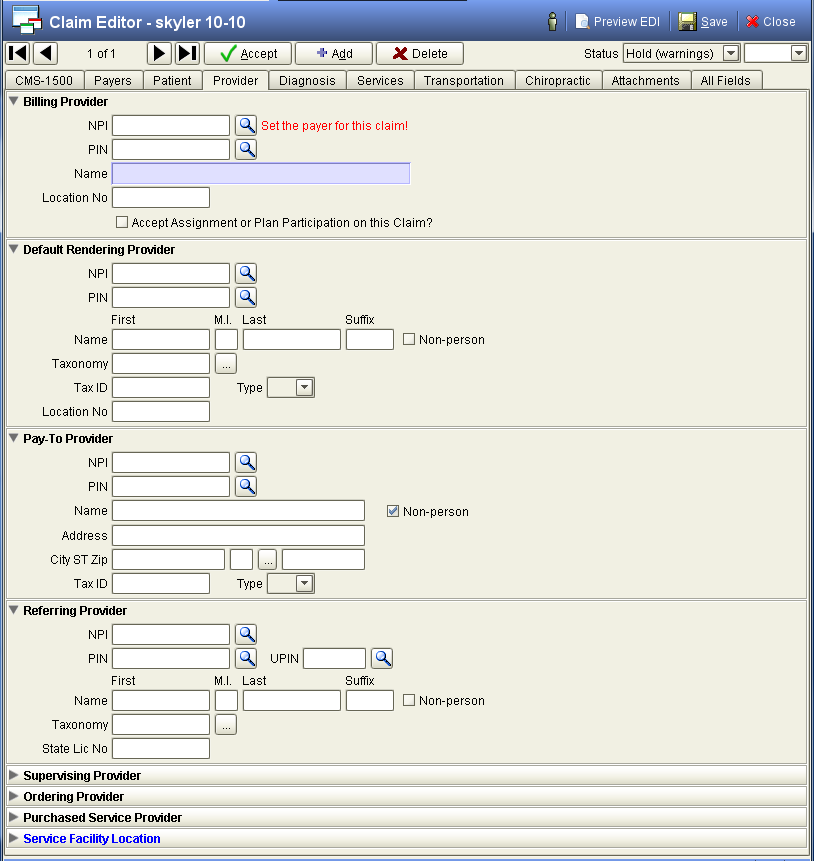
| NPI | The billing provider's National Provider Identifier. Click the search button on the right side of this field to search for and select a provider. Be sure you have a valid Payer selected on the claim before you select providers on the claim. |
| PIN | The billing provider's legacy Provider ID. Click the search button on the right side of this field to search for and select a provider. Be sure you have a valid Payer selected on the claim before you select providers on the claim. |
IMPORTANT NOTE ON PAYER AND
PROVIDER PINs
The Provider ID is based on the Plan Type for the Payer on this claim.
A Medicare payer will result in the provider's Medicare PIN being used.
If you have setup a payer-specific PIN via the PIN Overrides screen
that PIN will be used if the payer on the claim matches the payer in
the PIN Overrides list. If the provider does not have a PIN for the
plan type that the claim is for, the provider ID field in the Claim
Editor will default to the provider's Tax ID. If a provider cannot be
found the provider ID field will be blank and you will see warnings
from SolAce.
| Name | The name of the provider or group. |
| Rendering Name | Name of rendering provider. |
| Accept Medicare Assignment on this Claim? | A check box indicating the provider accepts assignment on this claim. |
| NPI | The rendering provider's National Provider Identifer. Click the search button on the right side of this field to search for and select a provider. Be sure you have a valid Payer selected on the claim before you select providers on the claim. |
| PIN | The rendering provider's legacy Provider ID. Click the search button on the right side of this field to search for and select a provider. Be sure you have a valid Payer selected on the claim before you select providers on the claim. |
| Name | Name of Rendering provider. |
| Non-Person | Check if name is a business. |
| Taxonomy | Taxonomy of Rendering Provider. |
| Tax ID | Rendering provider tax ID number. |
| Type | Rendering provider tax ID number type EIN or SSN. |
| NPI | The Pay-To provider's National Provider Identifer. Click the search button on the right side of this field to search for and select a provider. Be sure you have a valid Payer selected on the claim before you select providers on the claim. |
| PIN | The Pay-To provider's legacy Provider ID. Click the search button on the right side of this field to search for and select a provider. Be sure you have a valid Payer selected on the claim before you select providers on the claim. |
| Name | Name of Pay-To provider. |
| Non-Person | Check if name is a business. |
| Address/City/ST/Zip | Address of Pay-To provider. |
| Tax ID | Pay-To provider tax ID number. |
| Type | Pay-To provider tax ID number type EIN or SSN. |
| NPI | The Referring Provider's National Provider Identifer. Click the search button on the right side of this field to search for and select a provider. Be sure you have a valid Payer selected on the claim before you select providers on the claim. |
| PIN | The provider's PIN. Click the search button on the right side of this field to search for and select a provider. Be sure you have a valid Payer selected on the claim before you select providers on the claim. |
| UPIN | The UPIN number. |
| First Name | The first name of the referring provider. |
| MI | Type the middle initial of the referring physician. |
| Last Name | The last name of the referring provider. |
| Suffix | Type the specialty of the referring provider. (MD, DO, DC, DPM, etc.). |
| State Lic No | The referring provider's State License number. |
| Referral Date | The date the physician initiated the referral |
| NPI | The Supervising provider's National Provider Identifer. Click the search button on the right side of this field to search for and select a provider. Be sure you have a valid Payer selected on the claim before you select providers on the claim. |
| Provider ID | The provider's PIN. Click the search button on the right side of this field to search for and select a provider. Be sure you have a valid Payer selected on the claim before you select providers on the claim. |
| UPIN | The UPIN number. |
| First Name | The first name of the Supervising provider. |
| MI | Type the middle initial of the Supervising provider. |
| Last Name | The last name of the Supervising provider. |
| Suffix | Type the specialty of the Supervising provider. (MD, DO, DC, DPM, etc.). |
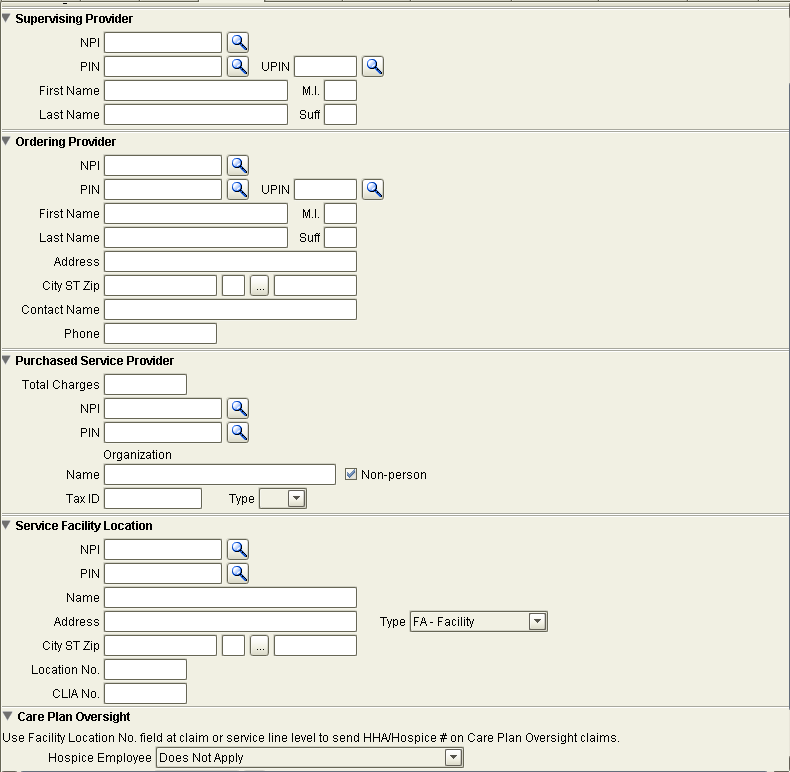
| NPI | The Ordering Provider's National Provider Identifer. Click the search button on the right side of this field to search for and select a provider. Be sure you have a valid Payer selected on the claim before you select providers on the claim. |
| Provider ID | The provider's PIN. Click the search button on the right side of this field to search for and select a provider. Be sure you have a valid Payer selected on the claim before you select providers on the claim. |
| UPIN | The UPIN number. |
| First Name | The first name of the Ordering physician. |
| MI | Type the middle initial of the Ordering physician. |
| Last Name | The last name of the Ordering physician. |
| Suffix | Type the specialty of the Ordering physician. (MD, DO, DC, DPM, etc.). |
| Address/City/ST/Zip | Address of Ordering provider. |
| Contact Name | Contact Name with Ordering Provider. |
| Phone | Phone number of contact person. |
| Total Charges | The total charges for purchased services. |
| NPI | The Purchased Service provider's National Provider Identifer. Click the search button on the right side of this field to search for and select a provider. Be sure you have a valid Payer selected on the claim before you select providers on the claim. |
| Provider ID | The provider's PIN. Click the search button on the right side of this field to search for and select a provider. Be sure you have a valid Payer selected on the claim before you select providers on the claim. |
| Organization Name | The organization name for purchased services. |
| Tax ID | The tax ID for the organization. |
| NPI | The Service Facility's National Provider Identifer. Click the search button on the right side of this field to search for and select the facility. Be sure you have a valid Payer selected on the claim before you select providers on the claim. |
| Facility PIN | The identification PIN of the facility. Optional in some cases. Note that if this ID is found in the SolAce Provider list then the provider entry's information will override the Facility information in the outbound transmit file. |
| Name | The name of the facility where the services were performed. |
| Address | The address of the facility. |
| City State Zip | The city, state and zip code of the facility. |
| Type | The type of facility the services took place. |
| Location No | The facility location number or the Home Health Agency/Hospice number. |
| Hospice Employee | Select applicable choice referring to Hospice Employee. |
| Assumed Care Date | The date of assumed care. |
| Relinquished Care Date | The date that the care was relinquished. |
To edit the Diagnosis data, click on the Diagnosis tab to locate the fields.
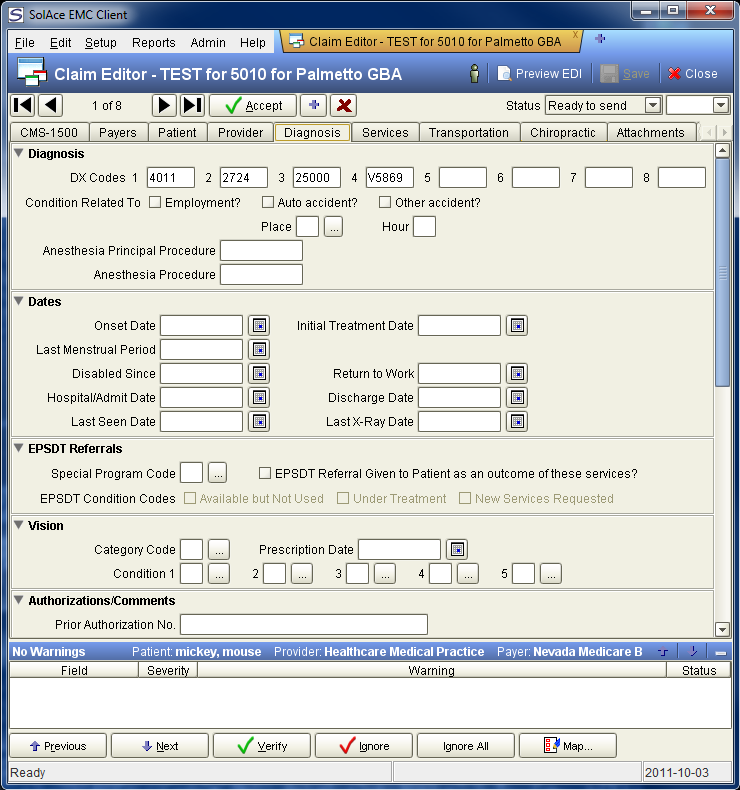
| DX Codes | 4 fields for diagnosis codes. Please note that SolAce does not ship with Current Procedural Terminology (CPT) Codes built-in. |
| Employment? | A check box indicating the condition is related to employment. |
| Auto Accident? | A check box indicating the condition is related to an auto accident. |
| Place | The abbreviation for the state where the accident occurred. |
| Other accident? | A check box indicating the condition is related to non-auto accident. |
| Hour | The hour the accident took place. |
| Onset Date | The onset date of the condition. Chiropractors should use the Initial Treatment Date field instead of this one. |
| Initial Treatment Date | The date the treatment series began, used by chiropractors for spinal manipulation claims. |
| Disabled Since | The date since the patient was disabled. |
| Return to Work | The date patient is/was able to return to work. |
| Hospital Admit Date | The date the patient was admitted. Required for claims involving In-patient care. Also needed for ambulance claims.Required for any place of service other than 11, 12 or 22. |
| Discharge Date | The date the patient was discharged. Requested on claims involving inpatient care if discharge date is known. |
| Last Seen Date | The date last seen by the supervising provider. |
| Last X-Ray Date | The date the last x-ray was performed. |
EPSDT Referrals
| Special Program Code | The list of special program codes. |
Authorizations/Comments
| Prior Authorization No. | The prior authorization number from the payer. |
| Referral No. | The referral number of the provider. |
| Mammography Cert. No. | The mammography certification number of the provider. |
| CLIA No. | Clinical Laboratory Improvement Amendments (CLIA) number. |
| IDE No. | Investigative Device Exemption number. |
| Demo Project ID | The ID of the Demo Project. |
| Comment 1 | A line for comments. The number of characters that you can enter for comments is displayed just below the Comment 2 field. The length of the comments depends on the payer that the claim is destined for, and the format of the transmit files that the payer accepts. |
| Comment 2 | A line for comments. |
Health Care Plan Information
| Discipline Type | Choose the type of service that is performed. |
| Visits Rendered | The number of visits rendered. |
| Visits Projected | The number of visits projected. |
Health Care Services Delivery
| Number of Visits | Up to 160 characters of free-form description. |
| Per Every | The choose how often the visits occured. |
| Visit Duration | Length of the visit. |
| Delivery Pattern | The pattern of the visits. |
| Pattern Time | The pattern time of the visits. |
To view or edit the lines of service data, click the Services tab to locate the fields. You have to click the line you want to edit for the values to show up in the editing area above the grid.
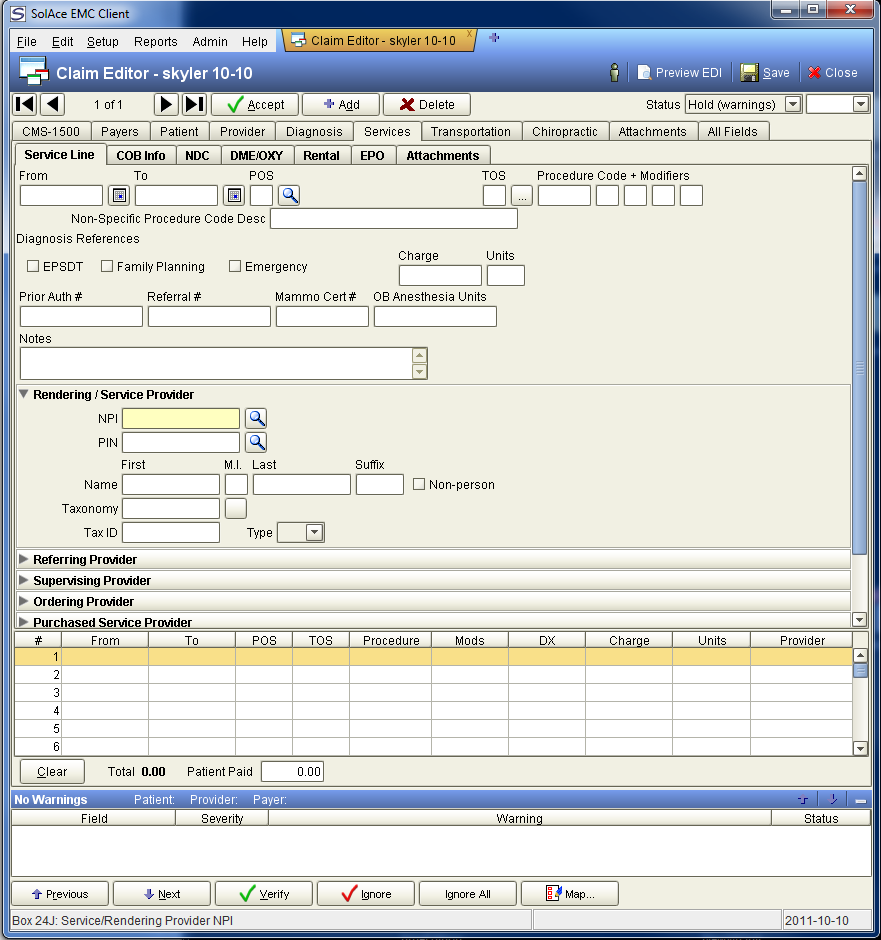
Line of Service
| Svc Date From | The date the provider's services began. |
| To | The date the provider's services ended. |
| Place of Svc | The place of service code. |
| Type of Svc | The type of service code. Required for commercial clearinghouse claims, not used for direct HIPAA-compliant claims. |
| Procedure | The procedure code for the service (CPT / HCPCS). |
| Modifiers | 4 fields for the procedure modifier. |
| DX References | 4 check boxes indicating the diagnosis for the procedure. These refer back to the codes entered on the Diagnosis tab. |
| Charge | The total charge for the procedure. |
| Units | The number of units. |
|
EPSDT |
A check box indicating the condition was EPSDT. |
|
Family Planning |
A check box indicating the condition was Family Planning. |
|
Emergency |
A check box indicating the condition was an emergency. |
| Notes | Any notes that are appropriate for the claim. Up to 160 characters of free form description. |
| Rendering/ Service Provider | The rendering provider that performed the service. |
| Referring Provider | The referring provider that referred the service |
| Supervising Provider | The supervising provider that supervised the service |
| Ordering Provider | The ordering provider that ordered the service |
| Purchased Service Provider | The purchased service provider that performed the service |
| Service Facility Location | The location where the service was performed. |
| Anesthesia Modifying Units | Modifiers used with anesthesia. |
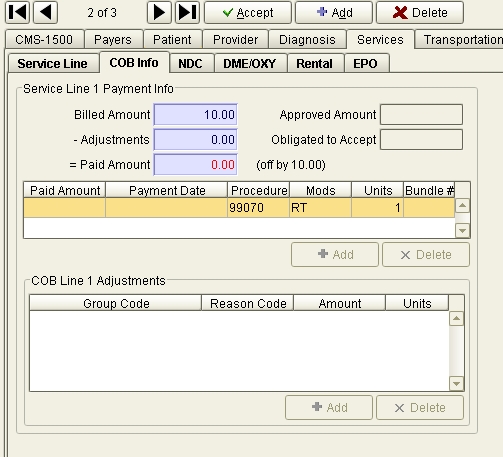
COB Info
| Billed Amount | The total amount billed. |
| Adjustments | The amount of adjustments for the line of . |
| Approved Amount | The Approved Amount. |
| Obligated to Accept | The amount Obligated to Accept. |
For more information on COB Info and secondary claims see Secondary Claim Preparation.

NDC
National Drug Code information.

DME/OXY
| Form | Choose Certificate of Medical Necessity. |
| Type | Type of form such as Initial, Recertification, or Revised. |
| Initial Date | Date of original Certification. |
| Revision Date | Date of revision of Certification. |
| Length of Need | Length of Need of Oxygen. |
| Date Signed | Date of signed of CMN on File with Supplier. |
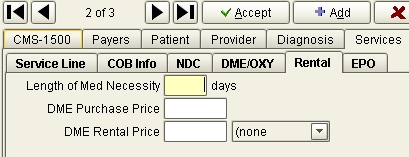
Rental
| Length of Med Necessity | The number of days that the durable medical equipment is estimated to be medically necessary. |
| DME Purchase Price | The purchase price for the durable medical equipment, as identified by the procedure code. |
| DME Rental Price |
The rental price for the durable medical equipment, as identified by the procedure code. The field to the right of the amount is the frequency of the rental payment. Payers use this information to determine whether to rent or purchase the equipment for the patient. |
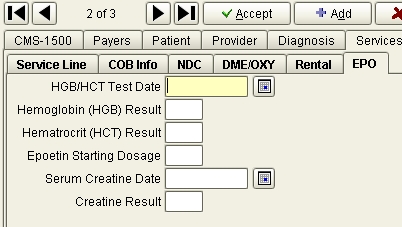
EPO
Information on lab blood tests.
Service Lines section
| Clear | A button enabling the user to clear the line of data. |
| Total Charges | The total charges for all lines of data on the claim. |
| Patient Paid | The amount the patient paid on the claim |
To edit the Transportation data, click on the Transportation tab to locate the fields.
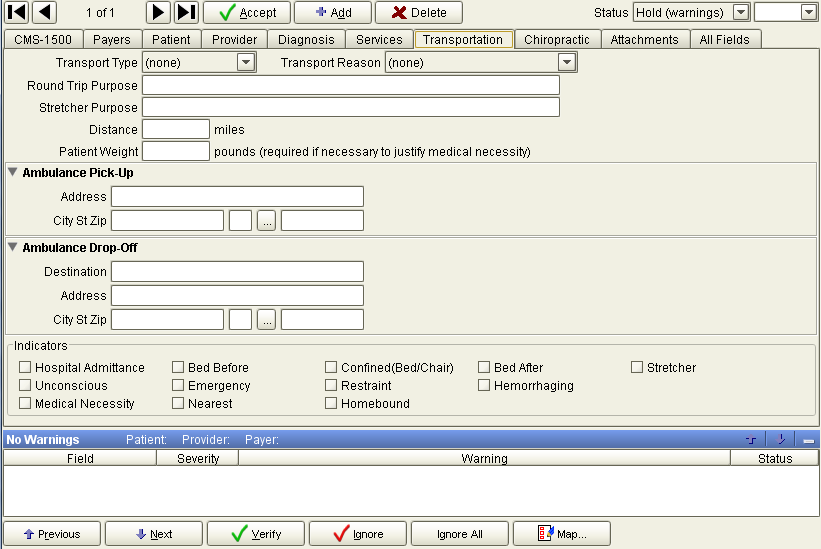
| Transport Type | The type of transportation code.
Options are: Initial, Return, Transfer, Round Trip. |
| Transport Reason | The reason for the transport. Options are: To the nearest facility, For the physician's benefit, To be near family. To specialist or equipment, To rehabilitation facility. |
| Round Trip Purpose | A line describing why the transport was round trip. |
| Stretcher Purpose | A line describing why a stretcher was necessary. |
| Destination | The destination for the transport. |
| Distance | Distance in miles for the transport. |
| Pickup Location | The address and zip code of the origin. If this value is populated, it overrides the Facility Zip on the Provider tab for HIPAA 837 purposes. |
| Patient Weight | The weight of the patient. |
Indicators section
| Hospital Admittance | A check box indicating the patient was admitted to a hospital. |
| Bed Before | A check box indicating the patient was bed confined before the ambulance service. |
| Bed After | A check box indicating the patient was bed confined after the ambulance service. |
| Stretcher | A check box indicating the patient was moved by stretcher. |
| Unconscious | A check box indicating the patient was unconscious or in shock. |
| Emergency | A check box indicating the patient was transported in an emergency situation. |
| Restraint | A check box indicating the patient had to be restrained. |
| Hemorrhaging | A check box indicating the patient had visible hemorrhaging. |
| Medical Necessity | A check box indicating the ambulance service was medically necessary. |
| Nearest | A check box indicating the transport was to the nearest facility. |
| Homebound | A check box indicating the transport was for an independent patient at home. |
To edit the Chiropractic data, click on the Chiropractic tab to locate the fields. The screen shown below is displayed when the payer accepts ANSI 4010A1 transmissions.
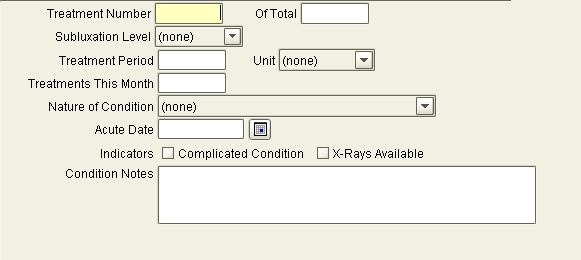
For ANSI 4010 transmissions (the older HIPAA format) there are several other fields. Some payers allow you to pass false but non-zero data in the fields when submitting ANSI 4010 claims. You can use the Default Value feature of fields on the map to default the unused chiropractic fields if you must submit ANSI 4010.
| Nature of Condition | Condition code indicating the nature of the patient's condition. |
| Acute Date | Acute manifestation date, required when condition code is M. |
| Complicated Condition? | Mark this box if the condition is complicated. |
| X-Ray Available? | Mark this box if X-Rays are available for review. Realistically this is not required in ANSI 4010A1 transmissions. |
| Condition Notes | Up to 160 characters of free-form description. |
This is where you would indicate attachment sent with the claim and provide a control number
The All Fields tab allows you to scroll through and edit all the fields used in the map. Additionally, a column displays the box number where the field can be found on the claim form, as well as the data that is in the field.
| To edit the data | click in the value column of the field to be edited and begin typing. |
| To navigate the list | use the scroll bar on the right side of the screen. |